Java Spring Boot Kafka Producer and Consumer
🕓 45 minutes
What you’ll learn
- Connect to kafka and create a new topic
- Create a new kafka producer and produce messages to kafka topic
- Create a new kafka consumer and consume messages from kafka topic
- Create multiple kafka consumers with different group-ids
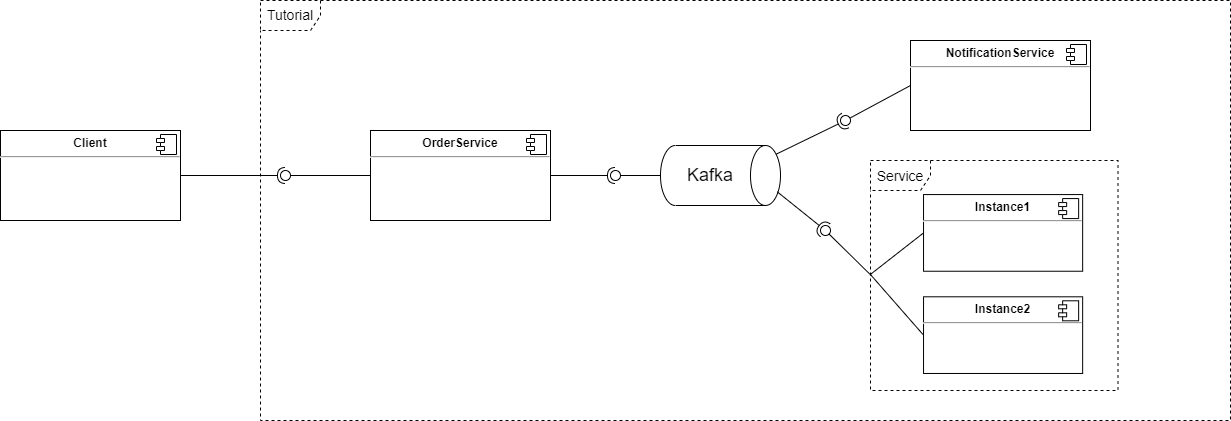
In this tutorial, we will create a simple java component using a Java Spring Boot scaffolder. We need to expose a single REST endpoint for producing a new event (in this case creating a new order). As a new order is received, other services should be alerted about this event. For distributing the event among other services, kafka will be used.
We send the message to a specific kafka topic (create-order). The message is then received by consumers listening to this topic.
Every consumer group processes the message only once, so we put NotificationService in one group and all instances of the Service in another one.
When the service receives the event (consumes the message from kafka topic), it logs the information.
Check this to learn more about consumer groups: https://docs.confluent.io/platform/current/clients/consumer.html#concepts

Services would normally be divided into three separate components (three separate git repositories), but for our purposes, we put all services into one base component and beans are differentiated by name. Instance1 and Instance2 represent two scaled pods of the same service.
Project source and deployed application
If you want to see the application work in action for yourself, it is deployed in CodeNOW. You just need to click on this link: https://stxplayground.codenow.com/applications/kafka-coding-examples and sign in with the following credentials:
- username: public-user
- password: Public-user123.
This example project can be cloned from: https://gitlab.cloud.codenow.com/public-docs/java-spring-boot-demo/springboot-kafka-producer-consumer
Prerequisites
Run kafka
- with docker or locally
For more information about how to run kafka, check README.md in the example project
Steps
Open your IDE, import the created component and start coding:
- Define the message payload. Here is an example of the
Order, which is a simple POJO with basic order data:- generate getters and setters with your IDE or use lombok annotations
Order attributes are not important. We just want to demonstrate how to produce and consume messages with objects attached to them.
  package coding.example;

  import lombok.Getter;
  import lombok.Setter;

  public class Order {

   @Getter
   @Setter
   private String orderID;

   @Getter
   @Setter
   private Date dateOfCreation;

   @Getter
   @Setter
   private String content;

  }
Configuration
Maven dependency
-
Add maven dependency to your
pom.xml<dependency>
<groupId>org.springframework.kafka</groupId>
<artifactId>spring-kafka</artifactId>
</dependency> -
For more details about spring-kafka, see: https://spring.io/projects/spring-kafka
Application properties
-
Add these properties to your
/codenow/config/application.yamland set up this file as a run configuration for your projectkafka:
order:
bootstrap-servers: ${KAFKA_RESERVATION_BOOTSTRAP_SERVERS:localhost:9092}
topic:
create-order: create-order
consumer:
group-id:
notification: notification
service: service -
Values of these properties will be accessed from the code using the
@Valueannotation
Producer
-
Create a configuration for the kafka template
package coding.example.orderService.kafka;

import org.springframework.beans.factory.annotation.Value;
import org.springframework.context.annotation.Bean;
import org.springframework.context.annotation.Configuration;
import org.springframework.kafka.core.DefaultKafkaProducerFactory;
import org.springframework.kafka.core.KafkaTemplate;
import org.springframework.kafka.core.ProducerFactory;
import org.springframework.kafka.support.serializer.JsonSerializer;

import java.util.HashMap;
import java.util.Map;

@Configuration
public class CreateOrderProducerConfig {

    @Value("${spring.kafka.order.bootstrap-servers}")
    private String bootstrapServers;

    @Bean
    public <K, V> ProducerFactory<K, V> createOrderProducerFactory(){
        Map<String,Object> config = new HashMap<>();
        config.put(org.apache.kafka.clients.producer.ProducerConfig.BOOTSTRAP_SERVERS_CONFIG, bootstrapServers);
        config.put(org.apache.kafka.clients.producer.ProducerConfig.KEY_SERIALIZER_CLASS_CONFIG, JsonSerializer.class);
        config.put(org.apache.kafka.clients.producer.ProducerConfig.VALUE_SERIALIZER_CLASS_CONFIG, JsonSerializer.class);
        return new DefaultKafkaProducerFactory(config);
    }

    @Bean
    public <K, V> KafkaTemplate<K, V> createOrderKafkaTemplate(){
        return new KafkaTemplate<>(createOrderProducerFactory());
    }
} -
And now create
CreateOrderProducerservice- Spring Boot will automatically inject
@Bean createOrderKafkaTemplateand@Value createOrderTopicwhen it's needed
- Spring Boot will automatically inject
To learn more about inversion of control and dependency injection, check out this link: https://www.baeldung.com/inversion-control-and-dependency-injection-in-spring.
package coding.example.orderService.kafka;

import coding.example.Order;
import org.slf4j.Logger;
import org.slf4j.LoggerFactory;
import org.springframework.beans.factory.annotation.Value;
import org.springframework.kafka.core.KafkaTemplate;
import org.springframework.kafka.support.SendResult;
import org.springframework.stereotype.Service;

import java.util.concurrent.ExecutionException;

@Service
public class CreateOrderProducer {

private static final Logger log = LoggerFactory.getLogger(CreateOrderProducer.class);

private final KafkaTemplate<String, Order> createOrderKafkaTemplate;

private final String createOrderTopic;

public CreateOrderProducer(KafkaTemplate<String, Order> createOrderKafkaTemplate,
                              @Value("${spring.kafka.order.topic.create-order}") String createOrderTopic) {
    this.createOrderKafkaTemplate = createOrderKafkaTemplate;
    this.createOrderTopic = createOrderTopic;
}

public boolean sendCreateOrderEvent(Order order) throws ExecutionException, InterruptedException {
    SendResult<String, Order> sendResult = createOrderKafkaTemplate.send(createOrderTopic, order).get();
    log.info("Create order {} event sent via Kafka", order);
    log.info(sendResult.toString());
    return true;
}
}
Consumer
This step needs to be followed for every service that wants to consume messages from kafka topic
- Create consumer configuration
Don't forget to specify the right value of groupId for the specific service
package coding.example.notificationService;

import coding.example.Order;
import org.apache.kafka.clients.consumer.ConsumerConfig;
import org.apache.kafka.common.serialization.StringDeserializer;
import org.apache.kafka.common.serialization.StringSerializer;
import org.springframework.beans.factory.annotation.Value;
import org.springframework.context.annotation.Bean;
import org.springframework.context.annotation.Configuration;
import org.springframework.kafka.annotation.EnableKafka;
import org.springframework.kafka.config.ConcurrentKafkaListenerContainerFactory;
import org.springframework.kafka.core.ConsumerFactory;
import org.springframework.kafka.core.DefaultKafkaConsumerFactory;
import org.springframework.kafka.listener.ContainerProperties;
import org.springframework.kafka.support.serializer.JsonDeserializer;
import org.springframework.kafka.support.serializer.JsonSerializer;

import java.util.HashMap;
import java.util.Map;
import java.util.UUID;

@EnableKafka
@Configuration("NotificationConfiguration")
public class CreateOrderConsumerConfig {

  @Value("${spring.kafka.order.bootstrap-servers}")
  private String bootstrapServers;

  @Value("${spring.kafka.order.consumer.group-id.notification}")
  private String groupId;

  @Bean("NotificationConsumerFactory")
  public ConsumerFactory<String, Order> createOrderConsumerFactory() {
      Map<String, Object> props = new HashMap<>();
      props.put(ConsumerConfig.BOOTSTRAP_SERVERS_CONFIG, bootstrapServers);
      props.put(ConsumerConfig.GROUP_ID_CONFIG, groupId);
      props.put(ConsumerConfig.CLIENT_ID_CONFIG, UUID.randomUUID().toString());
      props.put(ConsumerConfig.KEY_DESERIALIZER_CLASS_CONFIG, StringSerializer.class);
      props.put(ConsumerConfig.VALUE_DESERIALIZER_CLASS_CONFIG, JsonSerializer.class);
      props.put(ConsumerConfig.ENABLE_AUTO_COMMIT_CONFIG, false);

      return new DefaultKafkaConsumerFactory<>(props,new StringDeserializer(),
              new JsonDeserializer<>(Order.class));
  }

  @Bean("NotificationContainerFactory")
  public ConcurrentKafkaListenerContainerFactory<String, Order> createOrderKafkaListenerContainerFactory() {
      ConcurrentKafkaListenerContainerFactory<String, Order> factory =
              new ConcurrentKafkaListenerContainerFactory<>();
      factory.setConsumerFactory(createOrderConsumerFactory());
      factory.getContainerProperties().setAckMode(ContainerProperties.AckMode.MANUAL_IMMEDIATE);
      return factory;
  }
}
-
And now create
CreateOrderConsumerservice withcreateOrderListenerkafka listener- Kafka listener will be created from container factory
@BeannamedNotificationContainerFactory - Kafka listener will be listening to the topic specified under
${spring.kafka.order.topic.create-order}spring configuration value
  package coding.example.notificationService;

  import coding.example.Order;
  import org.slf4j.Logger;
  import org.slf4j.LoggerFactory;
  import org.springframework.kafka.annotation.KafkaListener;
  import org.springframework.kafka.support.Acknowledgment;
  import org.springframework.messaging.handler.annotation.Payload;
  import org.springframework.stereotype.Service;

  @Service("NotificationService")
  public class CreateOrderConsumer {

      private static final Logger log = LoggerFactory.getLogger(CreateOrderConsumer.class);

      @KafkaListener(topics = "${spring.kafka.order.topic.create-order}", containerFactory="NotificationContainerFactory")
      public void createOrderListener(@Payload Order order, Acknowledgment ack) {
          log.info("Notification service received order {} ", order);
          ack.acknowledge();
      }
} - Kafka listener will be created from container factory
REST Controller
Finally, we create a REST Controller, so we can generate events by sending requests to it
-
For more detail about the spring REST controller, see: https://spring.io/guides/gs/rest-service/
package coding.example.orderService.controller;

import coding.example.orderService.kafka.CreateOrderProducer;
import coding.example.Order;
import org.springframework.http.HttpStatus;
import org.springframework.http.ResponseEntity;
import org.springframework.web.bind.annotation.PostMapping;
import org.springframework.web.bind.annotation.RequestBody;
import org.springframework.web.bind.annotation.RequestMapping;
import org.springframework.web.bind.annotation.RestController;

import java.util.concurrent.ExecutionException;

@RequestMapping("/orders")
@RestController
public class OrderController {

    private final CreateOrderProducer createOrderProducer;

    public OrderController(CreateOrderProducer createOrderProducer) {
        this.createOrderProducer = createOrderProducer;
    }

    @PostMapping
    public ResponseEntity<?> createOrder(@RequestBody Order order) throws ExecutionException, InterruptedException {
        createOrderProducer.sendCreateOrderEvent(order);
        return new ResponseEntity<>(HttpStatus.OK);
    }

}
Build and Run
Try to build and run the application in your IDE. After a startup, you should be able to access your new controller’s swagger: http://localhost:8080/swagger-ui/index.html