Java Spring Boot REST Server with PostgreSQL
🕓 45 minutes
What you’ll learn
How to set up your application for :
- connecting to the PostgreSQL database
- getting data from REST API
- providing data to REST API.
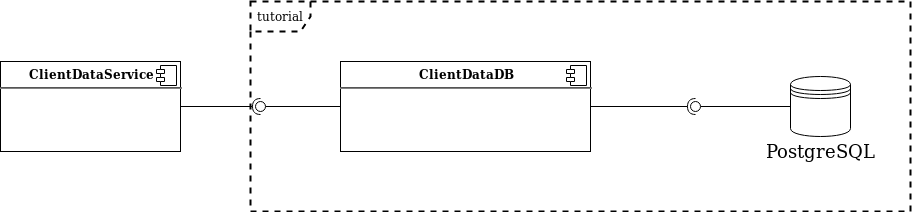
In this tutorial, we will create a simple java component with Java Spring Boot scaffolder with a connection to the PostgreSQL database storage. We want to expose a single REST endpoint for getting the basic client data information, creating a microservice CRUD layer above the DB storage.
Project source
This example project can be cloned from: http://gitlab.cloud.codenow.com/public-docs/java-spring-boot-demo/java-spring-boot-rest-server-with-postgresql.git
Prerequisites
- Prepare your local development environment for CodeNOW with Spring Boot.
- Follow the tutorial instructions in the Java Spring Boot Local Development tutorial.
- Run PostgreSQL locally.
- You can run PostgreSQL directly or using docker compose.
- The configuration file for docker-compose can be downloaded from the link that can be found in the section Docker compose and third-party tools of the Java Spring Boot Local Development tutorial.
- Create a new component
- For details, see the section Prerequisites of the Java Spring Boot Local Development tutorial.
Steps
Open your IDE, import the created component and start coding:
-
Add these maven dependencies to your
pom.xmlfile:<dependency>
<groupId>javax.persistence</groupId>
<artifactId>javax.persistence-api</artifactId>
<version>2.2</version>
</dependency><dependency>
<groupId>org.springframework.boot</groupId>
<artifactId>spring-boot-starter-data-jpa</artifactId>
<version>2.3.3.RELEASE</version>
</dependency> -
Define the JPA entity
Client. This simple table will store the basic client data:-
Generate getters and setters with your IDE
package org.example.service.repository.entity;

import java.time.LocalDate;

import javax.persistence.Entity;
import javax.persistence.GeneratedValue;
import javax.persistence.Id;

@Entity
public class Client {
    @Id
    @GeneratedValue
    private Long id;

    private String username;
    private String firstname;
    private String surname;
    private LocalDate birthdate;
}
-
-
Create a new
ClientRepository, which is a basic CRUD interface for Spring Boot data DB access:-
For more details about Spring Boot
@Repositoryannotation, see: https://docs.spring.io/spring-framework/docs/current/javadoc-api/org/springframework/stereotype/Repository.htmlpackage org.example.service.repository;
import org.example.service.repository.entity.Client;
import org.springframework.data.jpa.repository.JpaRepository;
import org.springframework.stereotype.Repository;
@Repository
public interface ClientRepository extends JpaRepository<Client, Long> {
Client getClientByUsername(String username);
}
-
-
Create a new controller and put all the parts together
-
For more details about Spring Boot controllers, see: https://docs.spring.io/spring/docs/3.0.0.M4/reference/html/ch15s03.html
package org.example.service.controller;

import org.example.service.repository.ClientRepository;
import org.example.service.repository.entity.Client;
import org.springframework.beans.factory.annotation.Autowired;
import org.springframework.web.bind.annotation.GetMapping;
import org.springframework.web.bind.annotation.PathVariable;
import org.springframework.web.bind.annotation.RequestMapping;
import org.springframework.web.bind.annotation.RestController;
import reactor.core.publisher.Flux;

import javax.validation.constraints.NotNull;
import java.util.List;

@RestController
@RequestMapping("/db")
public class ClientDataController {

    private final ClientRepository clientRepository;

    @Autowired
    public ClientDataController(ClientRepository clientRepository) {
        this.clientRepository = clientRepository;
    }

    @GetMapping("/clients")
    public List<Client> listClients() {
        return clientRepository.findAll();
    }

    @GetMapping("/clients/{username}")
    public Flux<Client> getClient(@PathVariable @NotNull String username) {
        return Flux.just(clientRepository.getClientByUsername(username));
    }
}
-
-
Next prepare database configuration:
-
Go to the PgAdmin console (http://localhost:5050 if using compose-postgre from our Local development manual) and create a new db client-db with the scheme client-data.
-
Add maven dependency to your
pom.xml:<dependency>
<groupId>org.postgresql</groupId>
<artifactId>postgresql</artifactId>
<version>42.2.11</version>
</dependency>
-
-
Now change the local configuration in
codenow/config/application.yaml:- Fill
{db user}and{db password}according to your local development setupdangerThese settings are valid only in your local development environment to connect to your local database! Never store your credentials in the codebase! You don't have to implement your own solution for the secure storage of credentials. In CodeNOW, credentials are securely stored for each deployed service (database/message broker/...).
- Fill
You can find how to set up the service connection in CodeNOW in the Deployment Tutorial and in the Connecting Services Tutorial. :::
-
Make sure you follow yaml syntax (especially whitespaces)
server:
    port: 8080
spring:
    main:
        banner-mode: off
    zipkin:
        enabled: false
    datasource:
        url: jdbc:postgresql://localhost:5432/client-db?currentSchema=client-data
        username: {db user}
        password: {db password}
        driverClassName: org.postgresql.Driver
    jpa:
        properties:
            hibernate:
                dialect: org.hibernate.dialect.PostgreSQL95Dialect
management:
    endpoints:
        web:
            exposure:
include: health, prometheus -
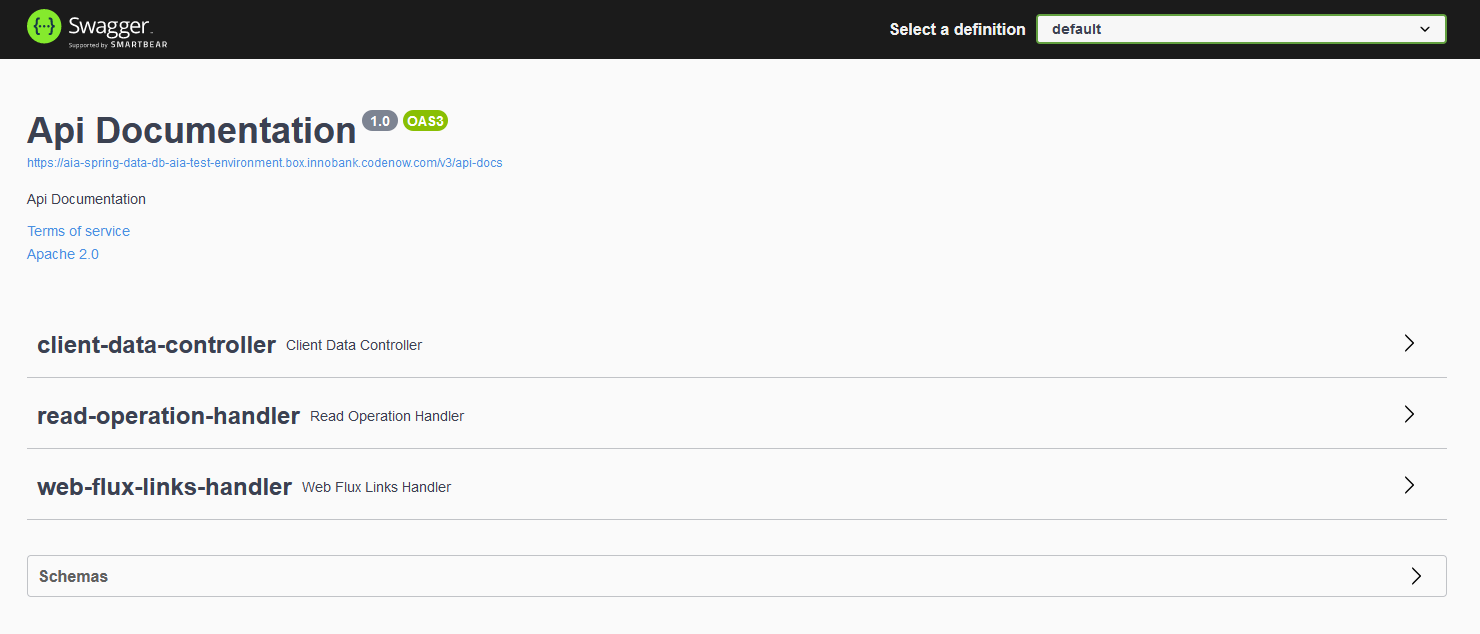
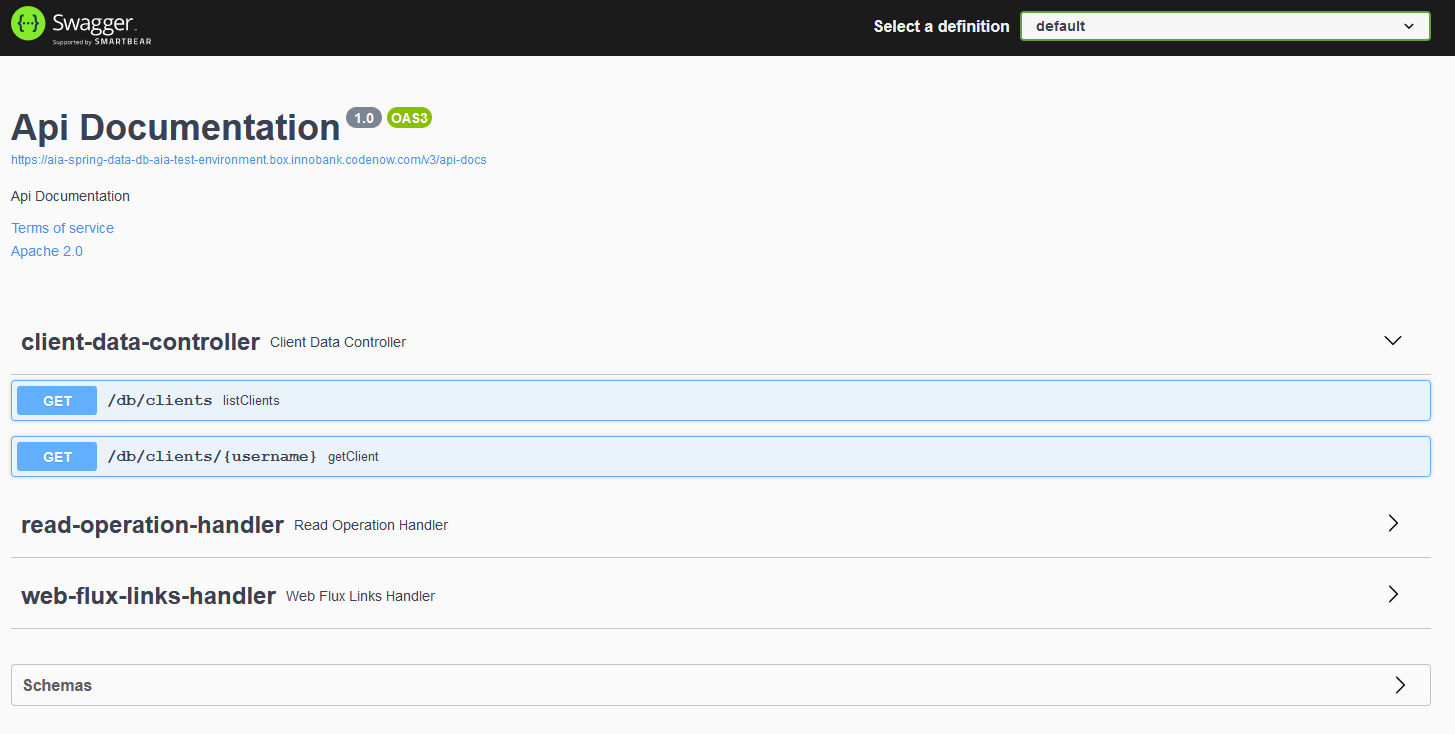
Try to build and run the application in your IDE. After startup, you should be able to access your new controller’s swagger: http://localhost:8080/swagger/index.html
- For correct setup, check the
README.mdin the project root or see the tutorial Java Spring Boot Local Development, section Prepare local development IDE
- For correct setup, check the
Deploy to CodeNOW
If your code works in the local development, you are ready to push your changes to GIT and try to build and deploy your new component version to the CodeNOW environment.
- Check the Get New PostgreSQL user manual to get CodeNOW managed component properties.
- Make sure to change the application.yaml properties from the local to the production setup.
- For more information about application deployment, see the Application Deployment and Deployment Monitoring tutorials.
What’s next?
See our other developer guides: